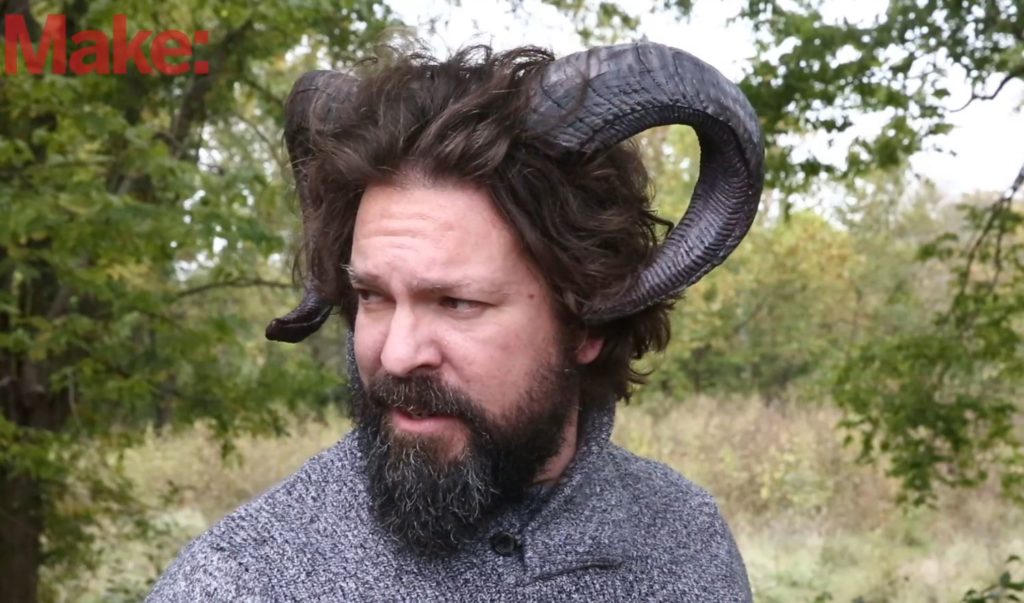
makezine.com: A good pair of horns is, quite frankly, a year round accessory in my mind. However, with Halloween on the horizon I couldn’t think of a better time to share the process of sculpting these. Follow along and learn how you can make a pair of your own.
6 comments:
There are actually a lot of good bits in this article. I love seeing step by step process about how to make something like this, because the process is always applicable to so many other projects you could work on. I do not think I have used EVA foam but it looks pretty similar to Ethafoam which I have used before. I made a “combat” cricket paddle out of ethafoam to protect the actors and it worked great. I cut the main shape out on the bandsaw. Then I kind of spliced a wooden handle into the foam to give the actor something rigid to hold onto. I think I added some metal wire in the foam as well just to give it some more rigidity. Then I did what I thought was a pretty smart step and coated it in paper mache that I made with flexible glue so that it could still bend and absorb energy without cracking. This was kind of like how they put mod podge on the horns in this article to give it a protective coat. All in all, I really love sculpting with these materials, and you can really do a lot with them.
All in all, I am pretty impressed with the quality of the ram horns! While I am sure this process won’t carry the Russman stamp of approval, it did create a lovely pair of horns that can be done in under 24 hours, something that is pretty important in the world of costume crafts. I clicked this article because I was interested to see if he would be using any type of thermaformable, because there are great options that could have been draped right over the aluminum foil, but the foam alone was pretty successful. I think the practice could have been improved by covering the sculpted horns completely with masking tape or muslin, drawing on seam lines, and then cutting them apart, which would have created a pattern. Also, doing it that way would have provided a full proof, uniform way to insure both horns matched. We learned this technique in our draping fundamentals class when Hugh taught us how to drape a banana.
I had probably considered this to be part of my halloween costume if I read this before October 31st, even though I did not really have a chance to enjoy halloween this year. Reading through the articles make me feel like I could do this without great difficulties as long as I have sufficient materials. It was impressive how he made it looks like not super professional (something you could just do by yourself at home), but still yielded a great quality with aluminum foils, duct tapes, glue, etc. He himself mentioned how he wanted his work to be low-tech, and I think he really did a great job at producing the best quality under that circumstance. I wonder how practical would this be in the real performances. Would this be durable, or would be limited to using only a few times? Would it be more efficient to just use the 3D printers when the budget and resources allow, or to choose manual work like this for the actual shows?
I do not have much interest in costume or prop design as a concentration and thought it would be interesting to read an article relating to this. It was very informative to read about the process of making this. I've seen many people do the aluminum foil than clay over method to make figures that will stay in place, but never truly understood the versatility of who it is always used. I thought it was amazing how he was able to match the horns so well also. Especially since he mentioned that it took him a while to get the shape he wanted with the first horn out of aluminum, I cannot imagine how he was able to replicate that so well. I was also surprised that he used tape instead of clay. The way he engrained the foam was amazing to me, as the end product ended up looking nothing like foam. Especially with the layer of mod podge and another layer of paint to hold it in place, I would really like to touch it to see how it feels. I also really appreciated how he included how to attach it onto his head. I feel like in many tutorials like this they forget to include a key part, how to apply it. This was an informative and well-structured article! I feel as though I could follow along and create it as well.
I think this is an awesome demonstration of making horns, and the article was really well laid out in making it accessible to a variety of skill levels. Last year I worked on a production of The Lion, The Witch, and The Wardrobe and this article would have been very helpful for making the horns for Tumnus. I think the best part of this article is that it is a pretty low-tech way of making horns and does not require a lot of expensive equipment. There are definitely a lot of ways you could get around not having some of the tools talked about in the article, and it does not seem as if you would need to be an expert in any of these methods to be successful in the creation of these horns. I honestly think this is a project I would really enjoy trying and that could be transferable to other items besides horns.
EVA foam is a pretty versatile material and it’s really good for making props and lightweight armor since it’s so shapeable. Patterning things for it is often pretty similar to how one would make clothing patterns too. I always enjoy watching videos and tutorials of people working with it. This process is almost identical to how I made my EVA foam mask last year for the Alice in Wonderland masks for Design for the Stage. The nice part about it is that the material can take a fair amount of beating and you don’t necessarily need to be gentle with it. Being tossed or thrown on the ground most likely won’t damage it at all. I think the one in this article does a pretty good job at breaking down the steps into an easy to understand process and the end result looks good! I probably would’ve added more weathering/ shading to them during painting to make them pop a bit more and look more realistic, but I like how they turned out overall.
Post a Comment